Header for Resources for Teachers
    home


Visual Arts Lesson: Bench

Designing a Classic Jewelry Box with Marquetry

Relevant TEKS

•Knowledge and skills. Complete TEKS for 6th grade art.


2. Creative expression/performance: b.
3. Historical cultural heritage: b.
4. Response/evaluation: b.

Lesson Objectives

•The students will understand how form and function work together to create a piece of art.

•The students will create a jewelry box using marquetry techniques.

•The student will use marquetry techniques to create a symmetrically designed jewelry box.

Introducing the
Work of Art

Description

Large Image

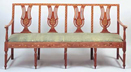
•The students will view the bench from the website.

•The students will identify and descibe in detail the parts of the bench: arms, legs, seat and apron.

•The students will find the inlaid wood on the bench.

•The students will note the geometric patterns on the apron of the bench. What are the shapes? How do they make up a symmetrical design?

•Discuss the process of marquetry ornamentation and how it was used in this wardrobe. Find the other wardrobe from "Grandeur of the Viceregal Mexico" in the online exhibit. What art technique is used in this piece of furniture? Describe the similarities and differences in marquetry of each piece.

Art Activity

Two forty-five minute lessons

Materials:
paper
x-acto knife
Colored paper
box

•Have students bring a small box with a lid from home. A cigar box works well.

Day 1
•Draw symmetrical design of geometric shapes on paper using color pencils. Next, students need to select three colors of construction paper. They must decide which color will be the background (veneer) and what other two colors will create the inlaid geometric pieces. Have students cut the three papers the correct size for the lid.

Day 2
•Now draw the design on the background piece (the one on top) with pencil. Place paper in layers putting background piece back on top. Place other two colors underneath. Have students cut their shapes with x-acto knife, making sure they cut through each layer of construction paper. Next remove cut pieces from each layer. Put cut shapes from two bottom layers back into the cut out areas of the background (top) layer, creating the color pattern Glue shapes in place. Glue top piece with cutouts in it to the top of the box lid. Cover the sides and the inside of the jewelry box with construction paper. Place lid with marquetry on the box.


Evaluation Procedure Marquetry process should be evident in completed jewelry box. Symmetry and repetition of color pattern should be visible. See assessment matrix.

image of a line divider
Home | Handbook | Lesson Plans | Games and Activities
Exhibition | Collectors and their Collections | For Teachers | Cultural Exchange | For Families | Timeline | About this Website | Site Map
Museum of Fine Arts Houston | College of Education, UH

Graphic links to MFAH, College of Education and University of Houston

link to museum of fine arts houston link to college of education at the university of houston link to the university of Houston website
Link to home page of The Granduer of Vice Regal Mexico